Tips and Tricks Latest Post
Tips and Tricks Latest Post |
| Adding PayPal Payment Buttons to Your WordPress Sidebar Easily Posted: 01 Jul 2021 12:35 AM PDT Many blog owners have recently started to monetize their websites by selling physical or digital products to their loyal customers from their sidebar. If you have a loyal following, perhaps you run a small blog from a WordPress website, there is no reason why you cannot try to make a little side cash by creating a product and selling it to the side of your written content. Selling from your website’s sidebar can be effective especially if you are selling products that relate directly to your blog or website. For example, if you run a website about Dog Breeding, selling dog products such as collars and leashes from your sidebar may be an effective way of seeing more money in your pocket. In this tutorial, we will look at how you can set up a product, create a PayPal Buy Now button, and add it to your website’s sidebar easily using the WP Express Checkout Plugin.  What is the WP Express Checkout Plugin?The WP Express Checkout Plugin, developed by Tips and Tricks HQ is a free software solution that can be used on a WordPress website to sell goods and services where all transactions are processed with the well-known and trusted payment gateway; PayPal. Using this plugin to create your payment buttons for your website’s sidebar will ensure your customers have the trust to submit their sensitive payment details (PayPal is well known and trusted) as well as provides them with a simple and straightforward transaction process. The way this plugin works is with a payment popup window rather than a checkout page which means that the customer will remain on your website. Your customers can continue to read your content after their transaction is complete which is important if you rely on money from ads. In this tutorial, we will look at how this plugin can be used to create a product and add a purchase button on the sidebar of your WordPress website. This is a simple plugin that even those without developer knowledge will be able to set up and use to start selling goods or services from their website, particularly in this tutorial, their website sidebar. The WP Express Checkout Plugin allows you to:
Why Should I Try and Sell Products/Services from my Website Sidebar?Before recent times, many websites purely existed to provide users with information or to sell simple products. Now with advances in web development, the opportunity for bloggers to add eCommerce solutions to their websites and for eCommerce websites to add a blog became a possibility. While dedicated product pages work well when you have a number of items for sale, when you are selling a handful of simple items, sometimes advertising them from the sidebar of your website can be more effective and lead to greater conversion. If someone lands on your website purely to read your content, they may not even realize that you’ve created a product page, so adding even your best selling product to your sidebar can catch a readers attention and may even see you gaining a sale of an item that they didn’t even know they needed!
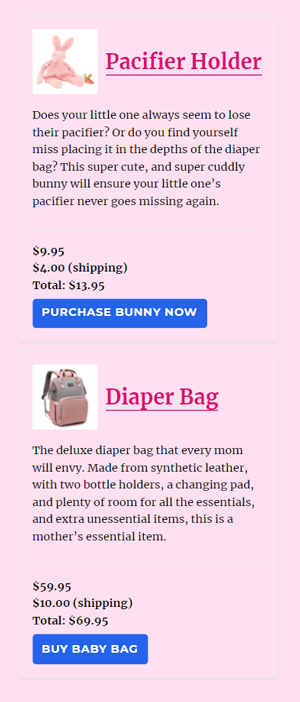
How Can I Add a PayPal Button to my WordPress Sidebar to Sell Products or Services?Video Tutorial: Creating a PayPal Purchase Button and Selling from my Website SidebarWritten Tutorial: Creating a PayPal Purchase Button and Selling from my Website SidebarTo Complete This Tutorial You Will Need: While there is a number of steps to get set up to sell from your WordPress website’s sidebar, let me tell you, if you follow along it is simple and easy, and the best part is, the software we will be using is free (you’ll only be charged the low transaction fee for each sale set out by PayPal) and does not require developer knowledge to setup. Once you follow along and complete this TTHQ tutorial, you’ll have a sidebar that looks somewhat similar to our example below. The call to action buttons below are ‘Buy Now’ buttons, but for your website, you may be collecting donations so your buttons may be donation buttons or if you collect subscriptions, perhaps you’ve used the subscriptions addon to create subscription-style buttons. Complete our four easy steps below to turn your website’s sidebar into a potentially lucrative sales column. 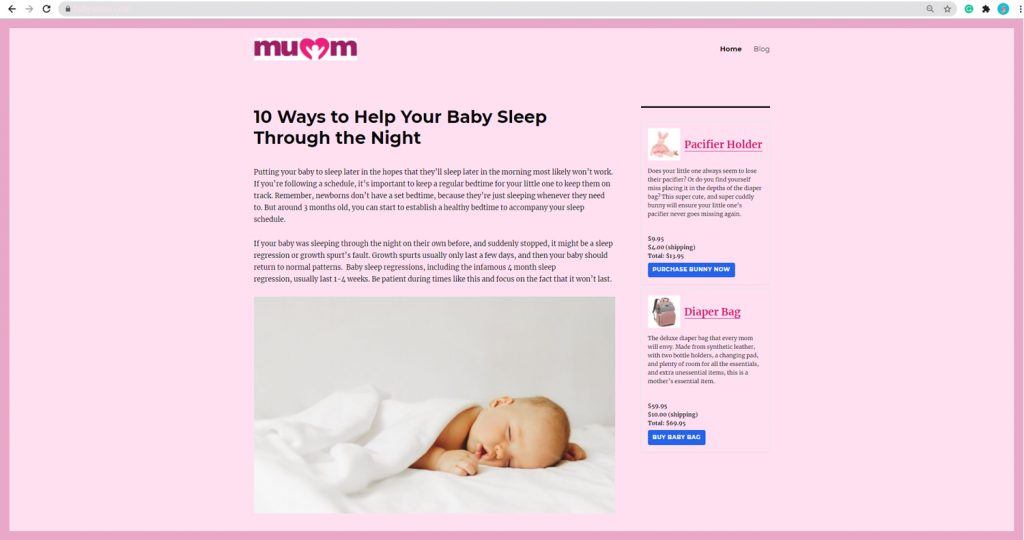 Step 1) Install, Activate and Set Up the WP Express Checkout PluginIn the case of this tutorial, we will be using the free WP Express Checkout Plugin to create our product purchase buttons which we will add to our website’s sidebar. This is a WordPress plugin, so ensure you have your WordPress website ready to go.
Before you move on you’ll also need to ensure you are using a WordPress theme that allows for a sidebar. Some of the simpler themes do not come with a sidebar as standard and without developer knowledge it may be tricky for you to include one. Free WordPress themes such as ‘Twenty Sixteen‘ (which I will be using in this tutorial) come with website sidebar functionality. 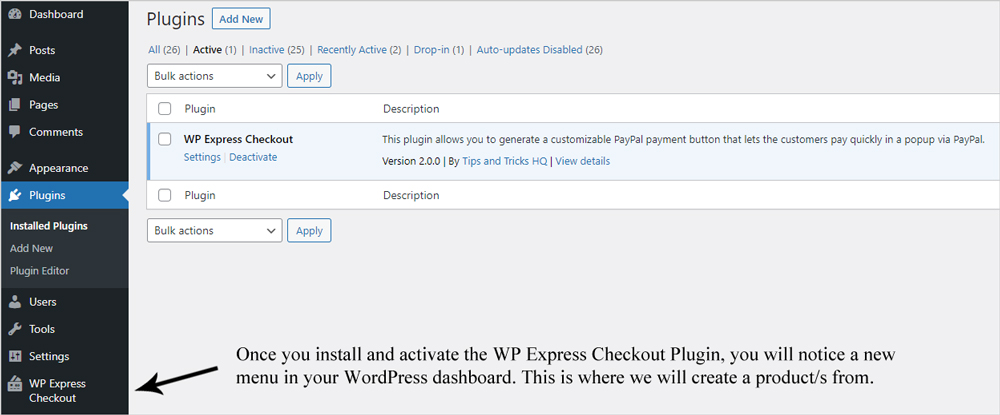 Step 2) Create Your Physical or Digital ProductYou can create both physical and digital products using the WP Express Checkout Plugin. To create your product that you will then add to your website’s sidebar complete the following:
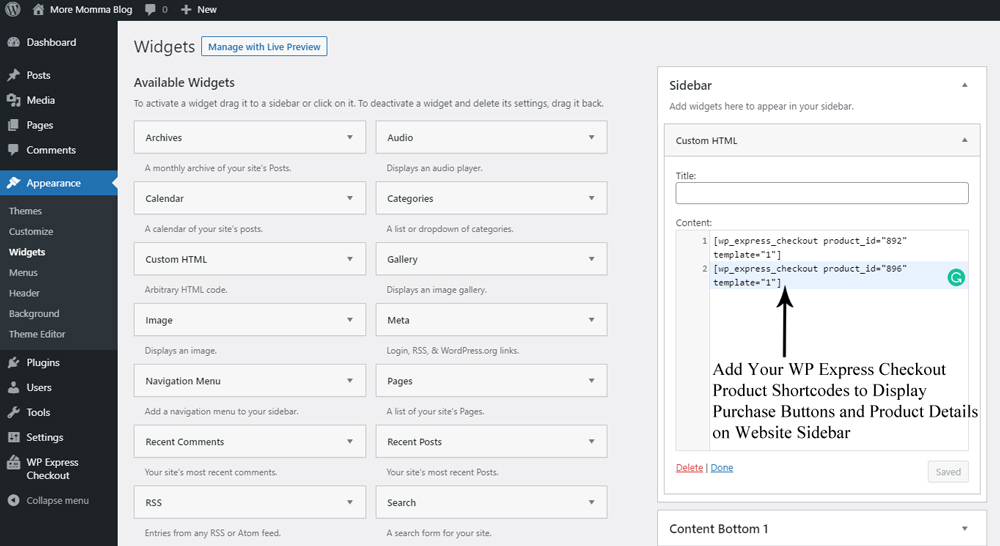
 If you wish to add a donation button instead that you will use to collect money from your customers/readers you can also achieve this with the free WP Express Checkout Plugin. Simply follow this documentation to create your donation-style product. Then continue with ‘Step 3)‘ below to add it to your website’s sidebar. Step 3) Add Your Product Shortcode to a Sidebar WidgetNow that you have created your product, whether that be a physical or digital product, it is time to add it to the sidebar widget of your website. As I mentioned earlier, to be able to do this step, you’ll need to ensure your theme allows for a website sidebar. You will have copied your shortcode, simply add the parameter: template “1” into the shortcode so that instead of it just displaying your purchase button, it also displays a nice product box with your product title, description and thumbnail image. You shortcode should look similar to the following example shortcode: [wp_express_checkout product_id="PRODUCTID" template="1"] If you do wish to just simply have a purchase button and you intend on typing up different details in your sidebar widget, feel free to leave out the template parameter. Once you have your shortcode copied that looks like that complete the following:
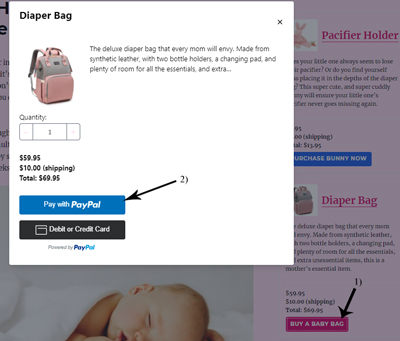
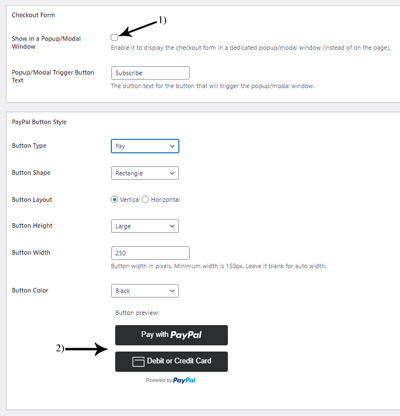
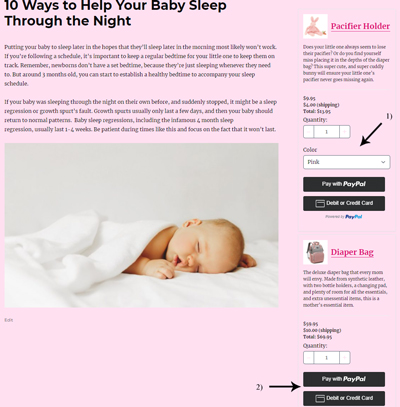
 Step 4) View Your Website’s Sidebar and Complete a Test TransactionIf you go to your website homepage, you should now see your product, or in my case products that you have created with their corresponding purchase buttons. If a customer was to land on your website and click on your ‘Buy Now’ style payment buttons, they would see a payment popup window where they can then choose to use their PayPal account or debit/credit card to make a payment to complete a successful transaction. You can test this process as if you were a customer yourself by using a PayPal sandbox account. You can find out more information on using PayPal sandbox to complete testing on your website here. In the example below, I have created a simple physical product that has one variation (color). I have allowed the customers to specify quantity also. It took me no longer than 5 minutes to create this product from start to finish with the WP Express Checkout Plugin. 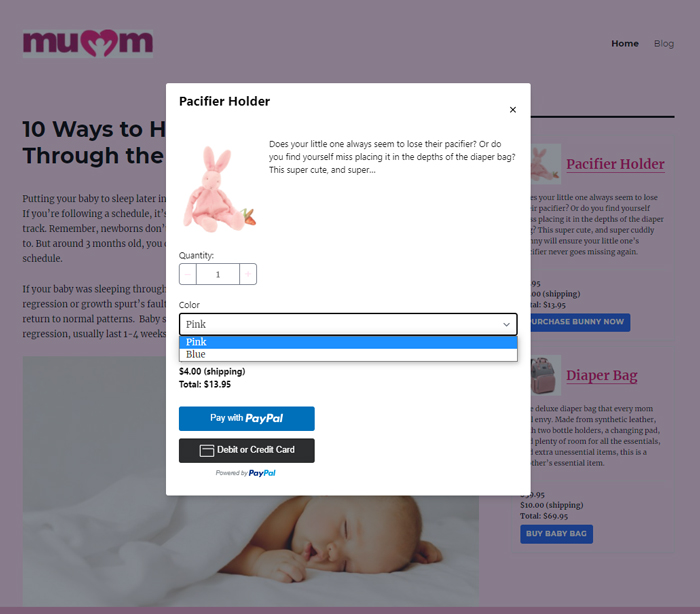 Once a customer checks out successfully on your website, you will receive the funds into your nominated PayPal account that you set up using your credentials in the WP Express Checkout Settings menu. To view the orders on your website and locate your customer’s shipping information click on the ‘Orders‘ menu under ‘WP Express Checkout‘ in your WordPress dashboard. Click on the order you wish to view more information about and it is here you will see the customer’s shipping details (if you are selling physical products).  Customizing the Look and Feel of Your Website’s SidebarWhile the theme does have a part to play in the overall feel of a website’s sidebar, there are a number of changes you can make to alter the appearance so that it flows better with the rest of your website. In terms of changes you can make to the payment boxes you can: Give your payment button a custom text, by default it will read ‘Buy Now‘ but you can change this on a per-product basis from the product creation page. Simply write the text that you would like your button to read in the ‘Popup/Modal Trigger Button Text‘ field. You can also choose to show the checkout form on your sidebar rather than this in a PayPal pop-up window. This works well if you do not have a lot of variations, while if you do have many variations showing it in a popup window will work better otherwise the sidebar will be filled with product variations. You can achieve variations on the sidebar by unchecking the ‘Show in Popup/Modal Window‘ option in the WP Express Checkout ‘Settings‘ menu. From within the settings menu of the plugin, you also have the option to change the color and look of the PayPal payment buttons. For further customization of your website’s sidebar, you will need to have some developer knowledge to delve into CSS or potentially hire a developer to achieve the customization for you. The post Adding PayPal Payment Buttons to Your WordPress Sidebar Easily appeared first on Tips and Tricks HQ. |
| You are subscribed to email updates from Tips and Tricks HQ. To stop receiving these emails, you may unsubscribe now. | Email delivery powered by Google |
| Google, 1600 Amphitheatre Parkway, Mountain View, CA 94043, United States | |
 Create ‘Buy Now’ purchase buttons for goods/services both digital and physical



No comments: